Monday, 26 August 2019

MVC,MVVM architecture in swift

In this article I am trying to show you some basics about MVC and MVVMarchitecture with example.
First let me start with MVC design pattern.
  1. Model (M)M stands for Model and in design architecture Model is used to just represent the data.
2. View (V)
V stands for View. View is used to display the data (received from Model or ViewModel). So basically XIB,Storyboard acts as a View.
3. Controller (C)
C stands for Controller. Controller is mediator between View and Model/ViewModel, it receives structured data form the Model/ViewModel and passes that data to View to display it on screen.
Now let’s see it by very simple example.
In this example,
  1. We are getting some data from our web server
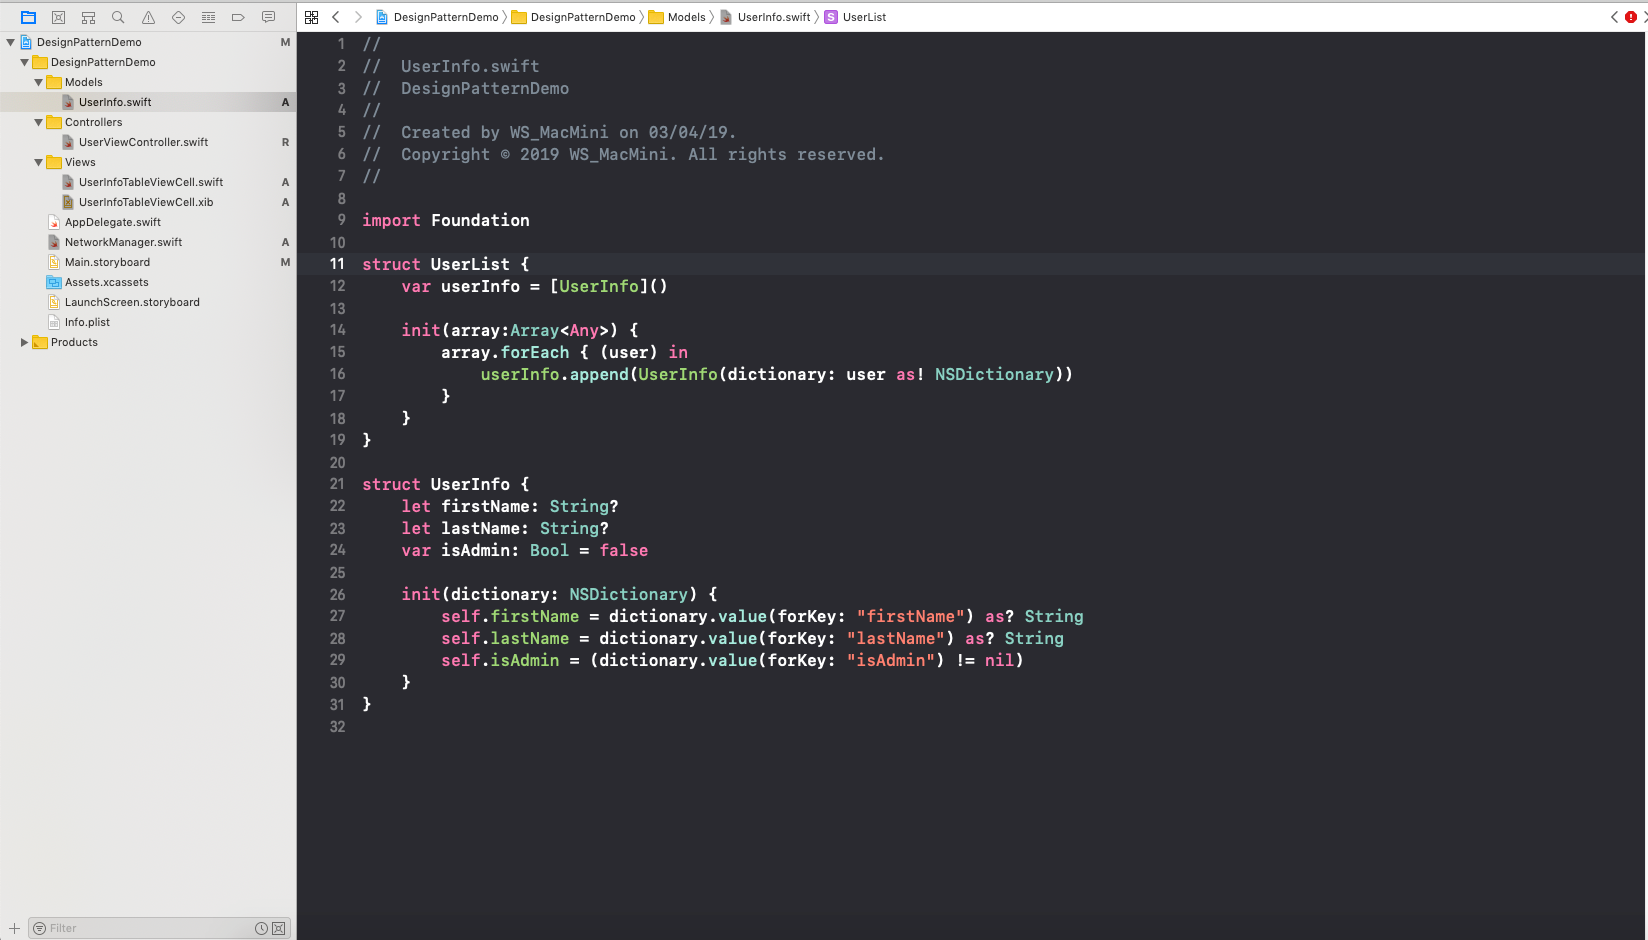
  2. Then pass that data (received from web server) to our model class
  3. Then display that data (User’s list) using tableview
UserViewController.swift — Controller_image1
UserViewController.swift — Controller_image2
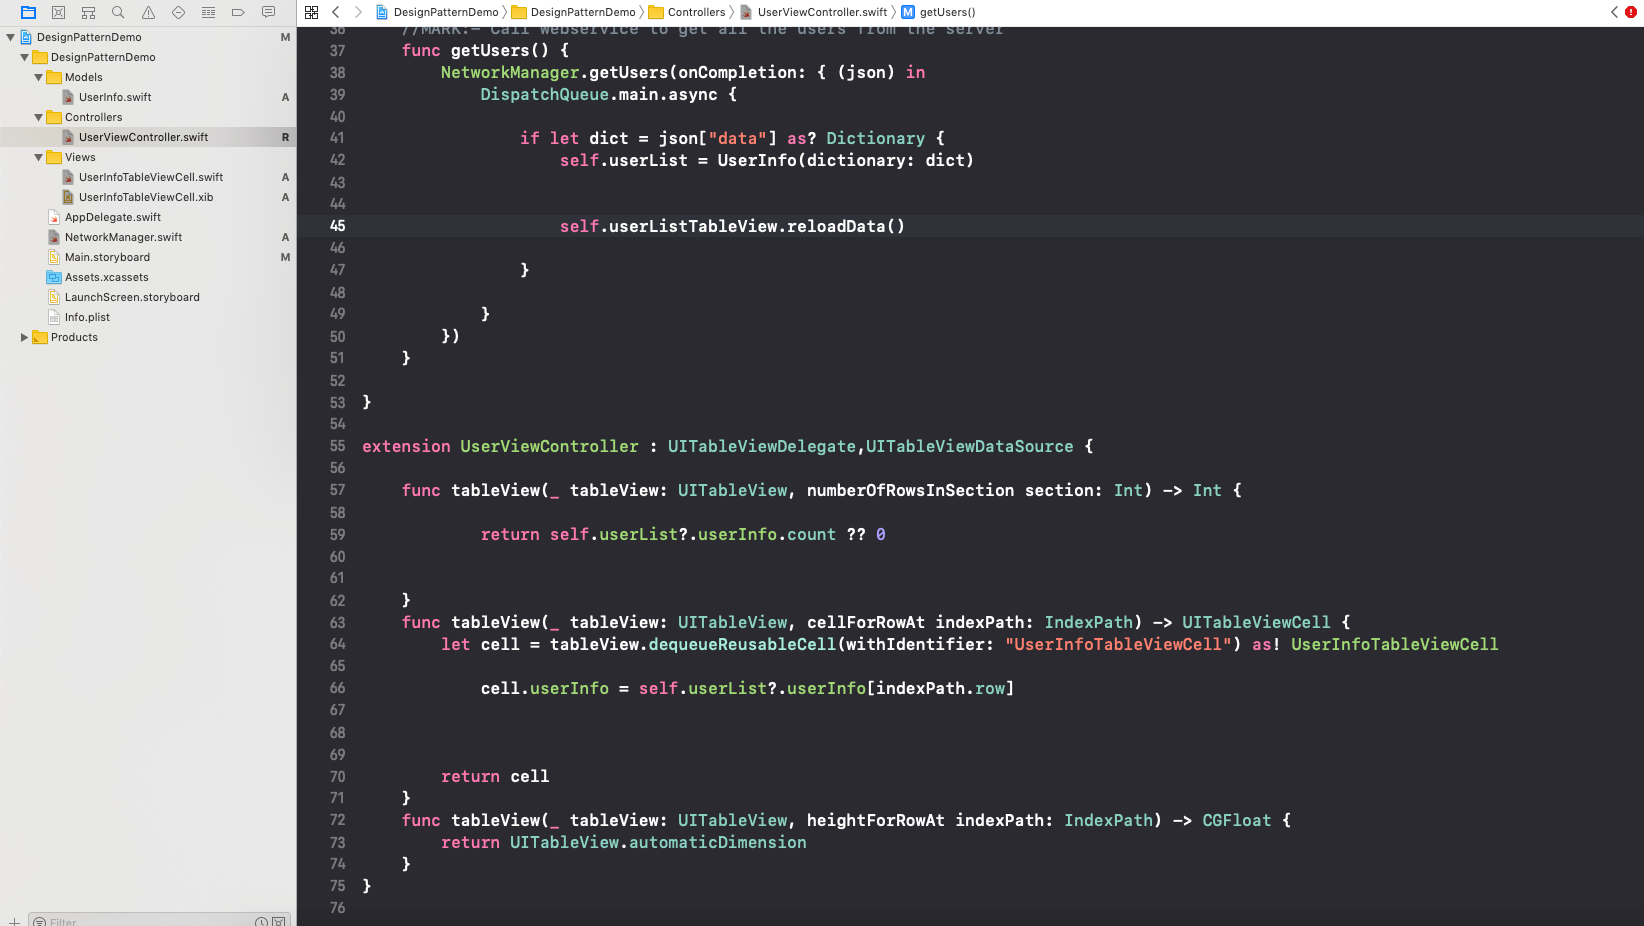
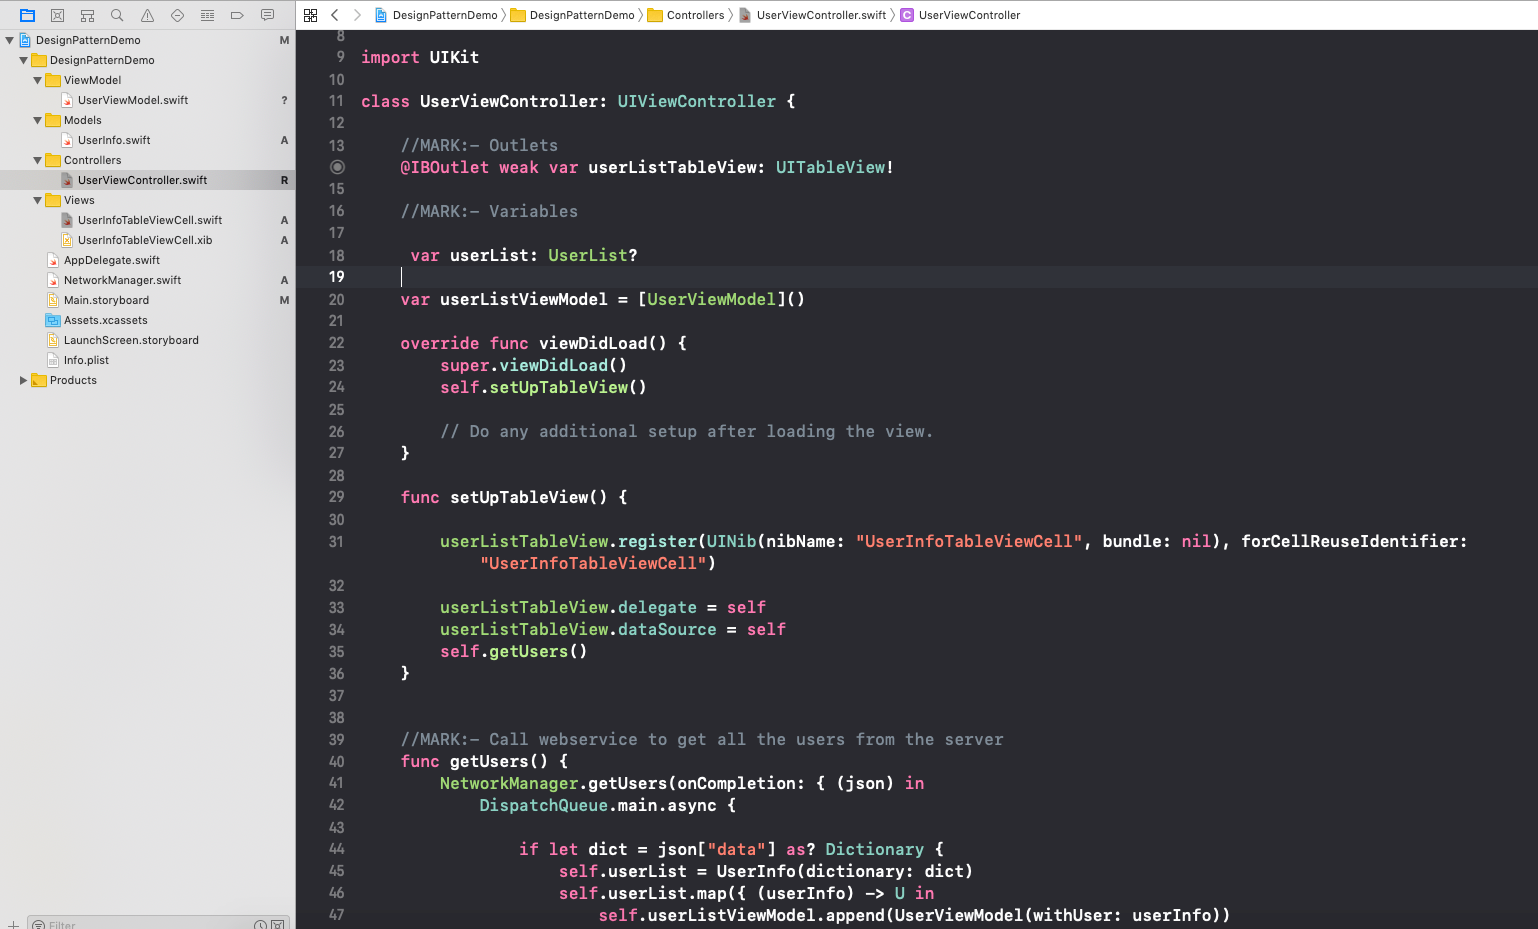
We are receiving some data from web server ( see Controller_image2) in Controller class and passes those data to our Model class ( see below Model_image3). And Model sends structured data back to controller.
UserInfo.swift- Model_image3
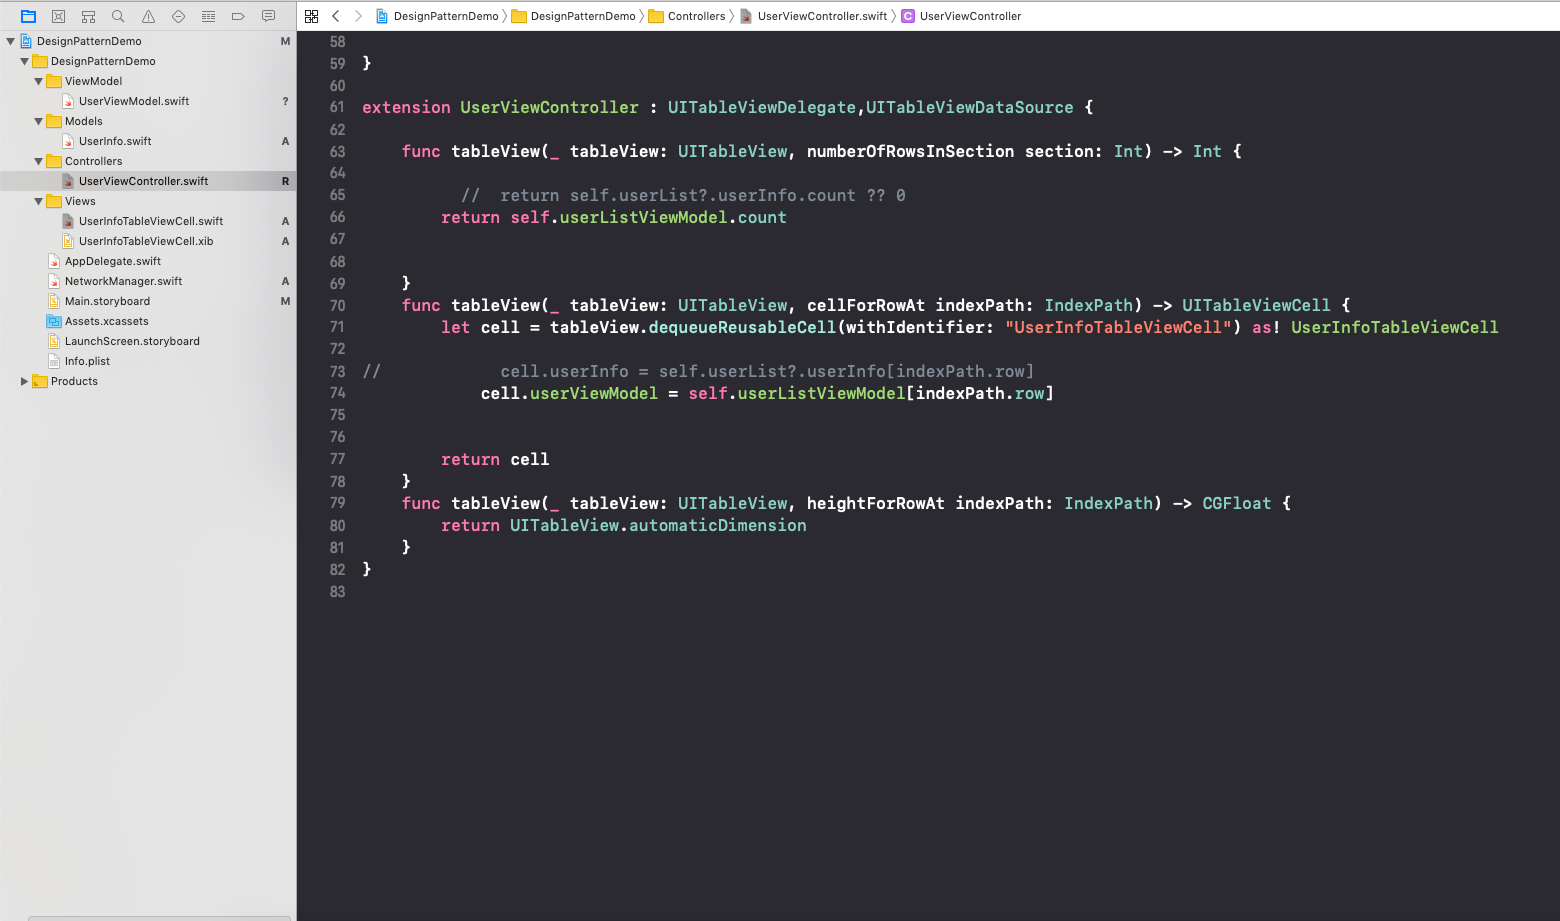
Then In tableview’s delegate method “cellForRowAt” we are passing particular userInfo object with its indexPath to display it to tableView’s cell. So here Controller is passing data to View to display it on screen.
UserInfoTbaleViewCell.swift — View_image4
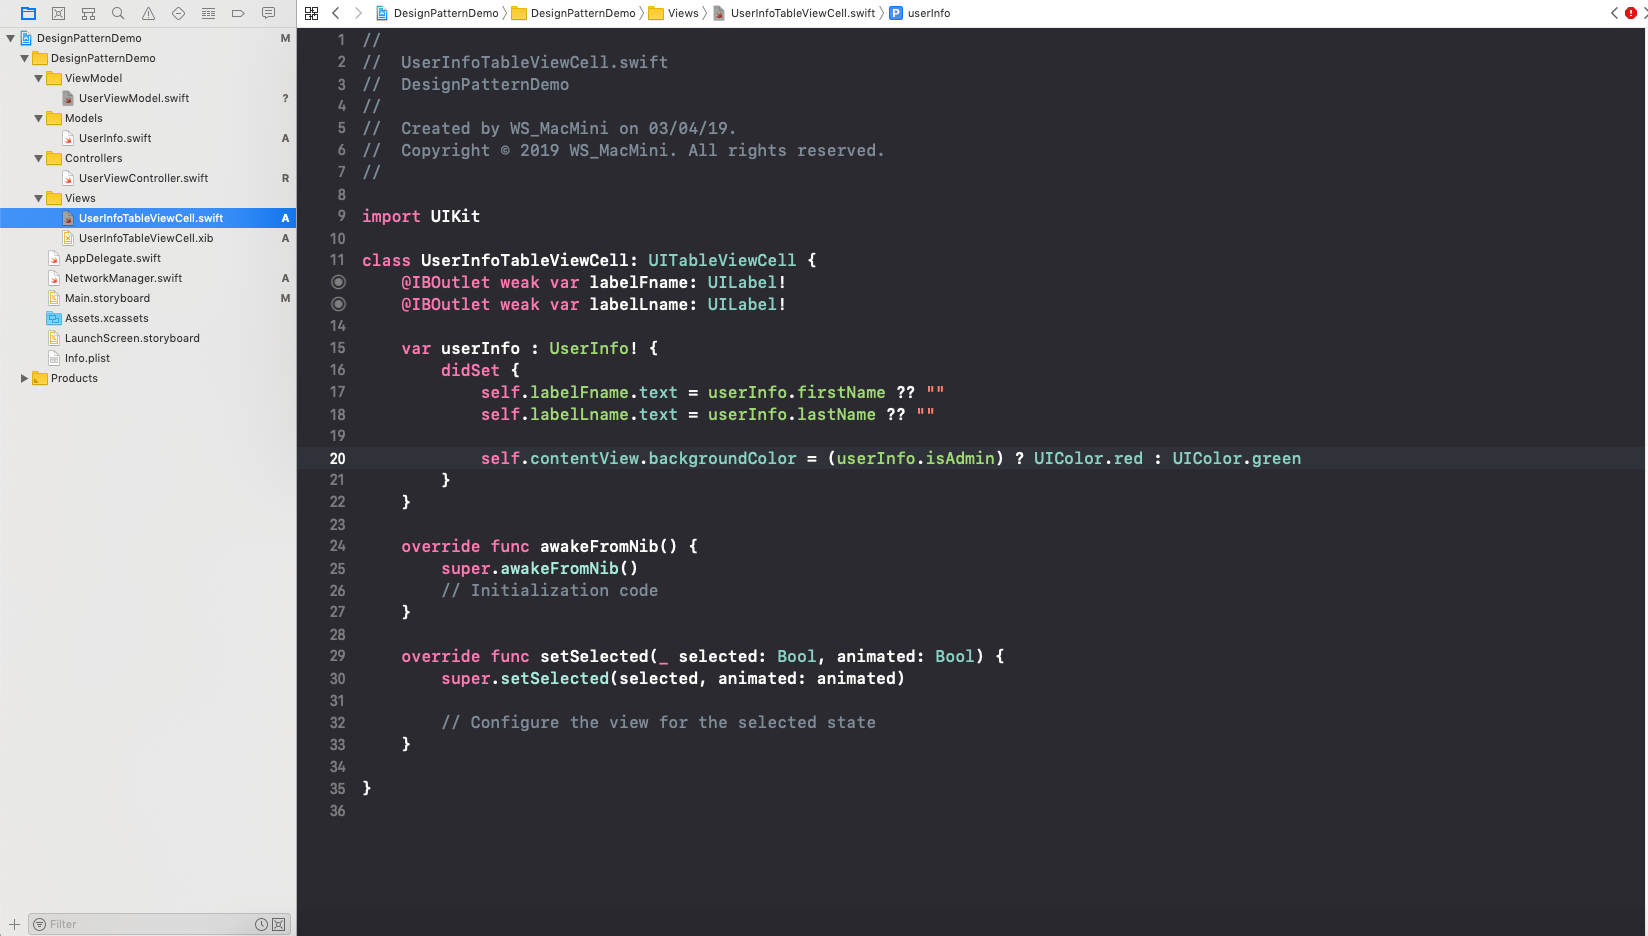
UserInfoTableViewCell.swift class acts as a View in our project (see View_image4).
So we can see that in Controller class, we are receiving data from server and then pass that response to Model class and then Model class sends structured data to Controller class back. Then Controller class sends that structured data to View class to display it. So we can say that Controlleracts as mediator between Model and View class.
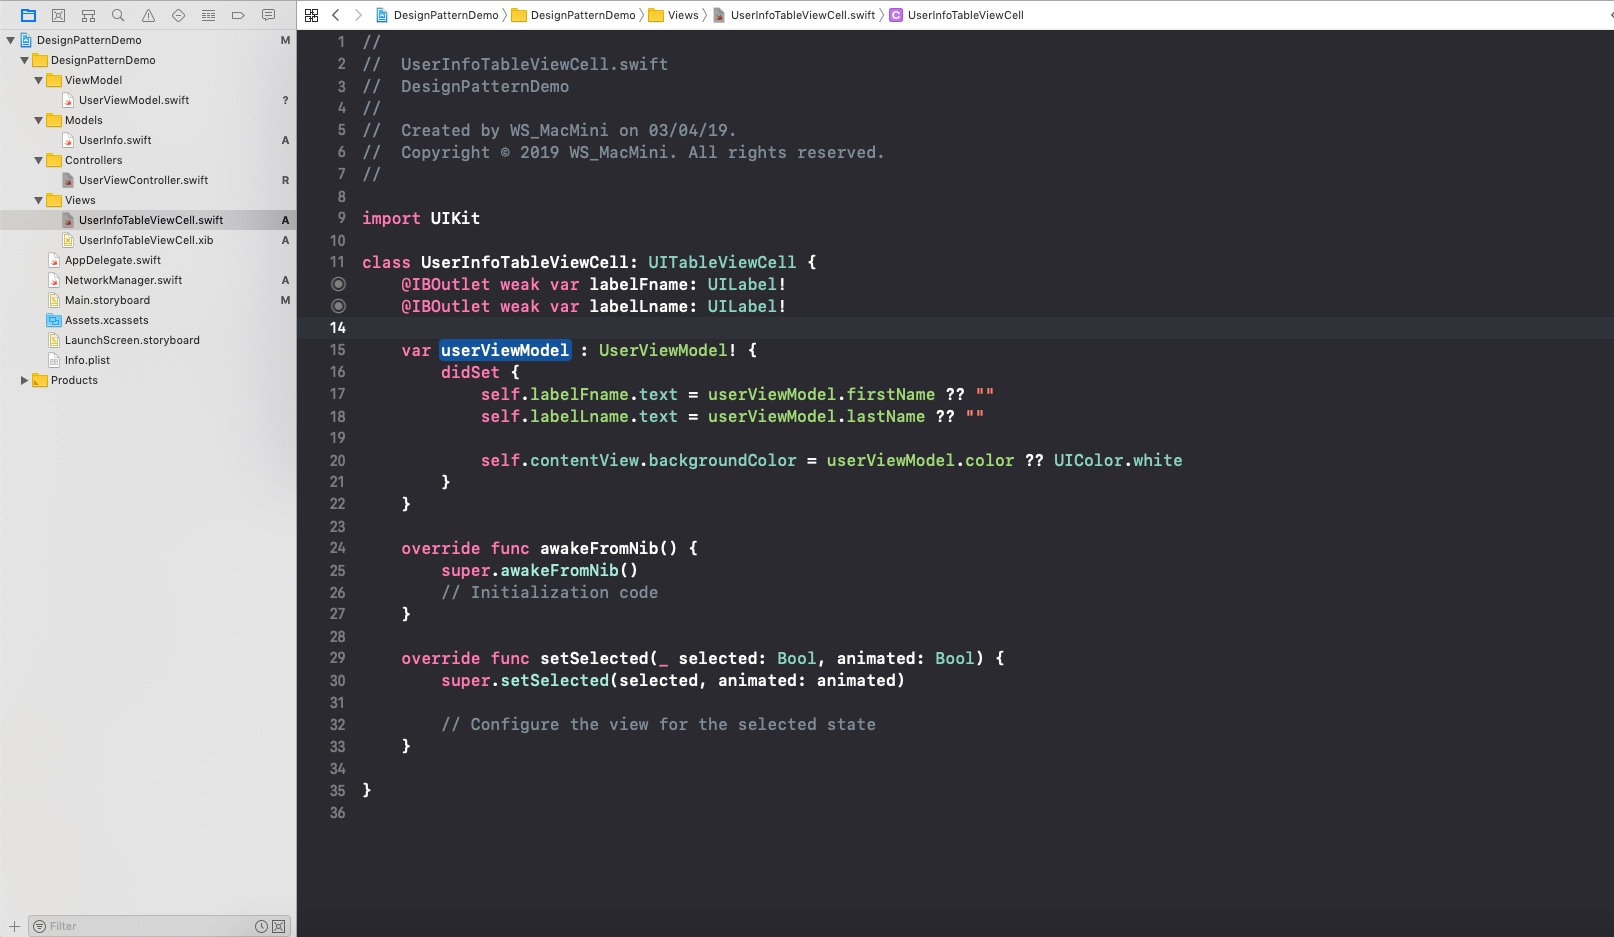
Another thing you might be noticed in MVC, View class is not just responsible to display data. it also performs some logic over the data and then display it. See below highlighted code implemented in UserInfoTbaleViewCell.swift — View_image4
var userInfo : UserInfo! {    didSet {           self.labelFname.text = userInfo.firstName ?? ""           self.labelLname.text = userInfo.lastName ?? ""           self.contentView.backgroundColor = (userInfo.isAdmin) ?   UIColor.red : UIColor.green          }}
you can see in above code, it first performs some logic (checking wether isAdmin property of userInfo is true or false ) for contentView’s background color and then accordingly it sets the background color.
So this is the main difference between MVC and MVVM, in MVVM “View class” is responsible for just displaying the data, it never performs any operation over data. To perform logic over data VM (View Model) class is there.

Now let’s see same example with MVVM Design pattern.

MVVM

In MVVM architecture, Model and Controller class are as same as in MVC.
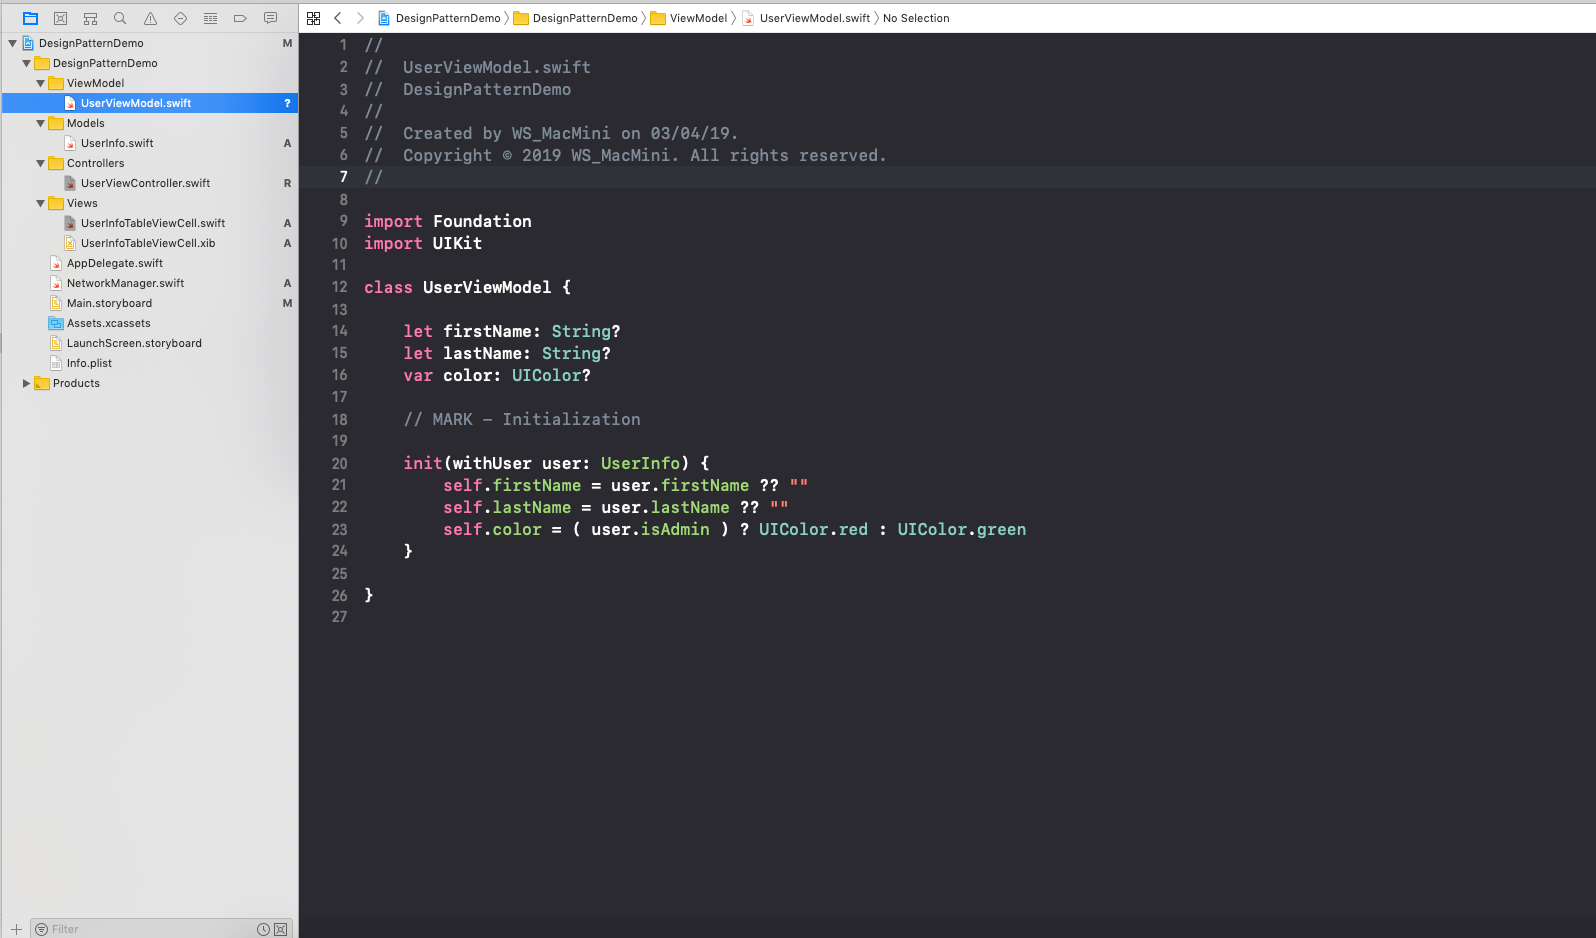
While in MVVM one new class ViewModel is there, and there is a little change in View class.
Let’s see sequence of operations in MVVM
  1. Controller class passes data (received from server) to Model class.
  2. Model class returns structured data to Controller class.
  3. Controller class passes structured data to ViewModel class.
  4. ViewModel class performs logic over that data if needed and then sends back that final data to Controller class.
  5. Controller class passes final data to View class and finally View class displays that data on the screen.
UserVIewModel.swift — ViewModel_image5
UserViewController.swift — Controller_image6
UserViewController.swift — Controller_image7
UserInfoTableViewCell.swift — View_image8
So this is the difference between MVC and MVVM. The example which I have used is so simple, in real you can have complex project. But in this article I have tried to demonstrate the difference between MVC and MVVM in a very simple way.
Each pattern has some pros and cons. So it is up to you which pattern you need to use as per requirement.

Sunday, 18 August 2019

CoreData in Swift5, (Save, Read, Delete, Update, MergeConflicts) and Add CoreData for existing project

Core Data is an object graph and persistence framework provided by Apple in the macOS and iOS operating systems.


For existing project, we can easily add CoreData by following below steps

First copy below code in AppDelegate.swift

we need to copy everything from applicationWillTerminate() to the end of the file:
func applicationWillTerminate(_ application: UIApplication) {
      // Called when the application is about to terminate. Save data if appropriate. See also applicationDidEnterBackground:.
      // Saves changes in the application's managed object context before the application terminates.
    self.saveContext()
}
// MARK: - Core Data stack
lazy var persistentContainer: NSPersistentContainer = {
/*
The persistent container for the application. This implementation
creates and returns a container, having loaded the store for the
application to it. This property is optional since there are legitimate
error conditions that could cause the creation of the store to fail.
*/
let container = NSPersistentContainer(name: "your-data-model-file")
container.loadPersistentStores(completionHandler: { (storeDescription, error) in
if let error = error as NSError? {
// Replace this implementation with code to handle the error appropriately.
// fatalError() causes the application to generate a crash log and terminate. You should not use this function in a shipping application, although it may be useful during development.
/*
Typical reasons for an error here include:
* The parent directory does not exist, cannot be created, or disallows writing.
* The persistent store is not accessible, due to permissions or data protection when the device is locked.
* The device is out of space.
* The store could not be migrated to the current model version.
Check the error message to determine what the actual problem was.
*/
fatalError("Unresolved error \(error), \(error.userInfo)")
}
})
return container
}()
// MARK: - Core Data Saving support
func saveContext () {
let context = persistentContainer.viewContext
if context.hasChanges {
do {
try context.save()
} catch {
// Replace this implementation with code to handle the error appropriately.
// fatalError() causes the application to generate a crash log and terminate. You should not use this function in a shipping application, although it may be useful during development.
let nserror = error as NSError
fatalError("Unresolved error \(nserror), \(nserror.userInfo)")
}
}
}
Configure Entity Name and Attributes

Create or Save Records to Core Data


When saving data, we can make the attributes as uniques for not repeating save values. 
There's a new section in the sidebar when selecting an entity in the editor for Core Data. You can set what constraint(s) you want to be unique across all instances of an entity


For automatic conflict resolution during saves, you'll need to make sure you've got a merge policy set for your managed object context or else you'll just get errors when saving (which might actually be what you want)
managedContext.mergePolicy = NSMergeByPropertyObjectTrumpMergePolicy
create records through for loop to create mRetrieve Data

Update Data


Delete Data

Sample Forms in iOS Swift

Object References

Alright, so what are Object references in Storyboards? You’ve probably seen the Object reference in the UI Library in Xcode (It’s the little yellow cube show in Figure 1). Back in the olden days of iOS dev this object used to be used for the File’s Owner reference in Nib files. If that doesn’t make any sense, don’t worry about it. We live in much better times now.
Figure 1 — Object Reference from Xcode’s UI Library
Now from what I’ve seen, it’s not used very much today. I know up until recently I never used it. So what can it do? The description in Figure 1.0 kinda says it all. These objects can be used to model anything that inherits from the NSObject class. You can attach N number of these things to view controllers in your storyboard. Then you can override their class from the default NSObject. Which is really cool! I can attach a bunch of dependencies to my view controller through the Storyboard. You then setup IBOutlets on your view controller to create references to these objects and the Storyboard will handle instantiating all of these objects.
Now you might be thinking that’s cool and all but couldn’t I just add those dependencies to my view controller without the outlets... Of course you can. However, the power of using the Storyboards means any dependencies of these objects can be configured through the Storyboard as well. The Storyboard will handle instantiating all of these objects for us and we don’t have to worry about it. The objects can also reference elements on the view through IBOutlets. We will see how this helps us next when we are implementing the forms.

Form Objects in Storyboards

This section is going to walk through building a sample Xcode project for our forms example. Feel free to follow along or if you would like to just read, there is a link to the project on my Github at the end of this article. Let’s start with our simple example. Figure 2 has the storyboard configuration for our form. There are two view controllers, one with a button that navigates to the second view controller all embedded in a navigation controller. This will allow us to create more links later on in part 2.
Figure 2— Storyboard Setup for Simple Form Example
The second view controller contains our form. This form is just three labels and three text fields all embedded in UIStackViews. There is also a submit button at the bottom that will print out the values of the forms.
Okay. Let’s get to coding. First, create a new group called Forms in the Xcode project. Then create two new files called Form.swift and FormControl.swift as shown in Figure 3.
Figure 3 — Form Group Setup
We are going to start with the FormControl.swift file. This file is going to contain the following protocol:
@objc protocol FormControl {
    var key: String? { get }
    var text: String? { get }    func clear()
}
This protocol will be what represents our field controls on each of our forms. The key is to identify the control, text is the value, and clear is to reset the value. Now, you’ll notice this protocol is defined with the @objctag. This will be important in our next code block.
class Form: NSObject {    @IBOutlet var controls: [FormControl]?    subscript(_ key: String) -> String? {
        return value(for: key)
    }    func value(for key: String) -> String? {
        return controls?.first(where: { $0.key == key })?.text
    }    func clear() {
        controls?.forEach { $0.clear() }
    }
}
The previous code block contains the actual Form class. There a bit of code here, so let’s go through it.
  1. First is the most important part. The IBOutlet referencing an array of FormControl s. This allows us to configure our form object on the Storyboard to have N number of form controls (Text Fields). This is also why the protocol requires the @objc attribute. If the protocol is going to be referenced within the Storyboard, it must have this attribute.
  2. Second is a subscript method to get values from each control field as follows: form["controlName"]
  3. Third is just a function version of our subscript method.
  4. Fourth is the form clear method.
The next file to create and class to implement is going to be the subclass of UITextField . Let’s put this file in our Forms group in Xcode. Here is the implementation:
@IBDesignable class TextField: UITextField {    @IBInspectable var key: String?
}extension TextField: FormControl {
    func clear() {
        text = nil
    }
}
In the previous code block I declared the TextField class as @IBDesignableto allow the key property to be configured via the Storyboard. Then the class conforms to the FormControl protocol via an extension (I usually implement all of my protocol conformance through extensions). Since the UITextField class already has an optional text property, we don’t need to declare the text property. Lastly let’s implement the simple form view controller:
final class SimpleFormViewController: UIViewController {    @IBOutlet var form: Form!
    
    @IBAction func submit() {
        print("Form Data:",
            form["firstName"],
            form["lastName"],
            form["age"])
    }
}
And this is it for the view controller. The IBOutlet references our form and the submit button will just print out the values from our form. Simple right! Alright, maybe not the simplest thing in the world, but from here on out, implementing forms should be easy. Let’s hop back over to our Storyboard to finish the configuration for the simple form.
First, change all the UITextField s to TextField s. Then drag one of the Object references to our view controller. You can see the object added to your view controller in the top bar of the interface as shown in Figure 4.
Figure 4 — Form object reference on the SimpleFormViewController
Then we want to change the class of the object reference to a Form object as shown in Figure 5. Once the object is a Form connect the IBOutlet form property to this object in the Storyboard.
Figure 5 — Form Attributes
Then move over to the Outlets inspector for the Form and connect all the text fields to the controls outlet collection in Figure 6.
Figure 6 — Form references to TextField controls
The last thing to configure is to add the keys to each text field. Make sure each text field is configured with the correct key as follows:
  • firstName
  • lastName
  • age
These keys will be how we extract each value from our form and we actually already handled this in the submit action in our view controller. Add the IBAction reference to the submit button in the Storyboard.
And now everything should be ready to go. Whew! That’s a lot steps, but we made it. Build and run, navigate to the simple form, enter some data, and we should get the following output:
Form Data: Optional("Eric") Optional("Downey") Optional("27")
Not the best output (thanks a lot optionals), but you get the idea. This is awesome because we can now have as many forms as we want and our view controllers don’t need to re-implement any form logic.

Setting Up Multiple App Targets in Xcode from a Single Codebase

 To create two different apps (like "Light" and "Regular") from the same codebase in Xcode, you can follow these steps b...